Gluten Free Cut Out Sugar Cookies
Cut out cookies are everyone’s favorite during the holidays, and this gluten free version will surprise you with how delightful they are as a festive treat. Soft and chewy, decorated with delicious buttercream frosting with a whisper of lemon. These cookies will be devoured at any party, and they will dress up any holiday cookie tray. Santa will request that these be left out for him on Christmas Eve.
What do I need to make these cookies?
For these classic holiday cookies you will need gluten free flour (make sure your gluten free flour mix contains xanthan gum), butter, sugar, eggs, vanilla, baking powder, and salt. For the frosting you will need butter, powdered sugar, vanilla, and lemon juice. Then to decorate you will need food coloring, various sprinkles, and sanding sugar.
How to make these classic cookies?
To make the dough, start by creaming the sugar and butter until smooth with your electric mixer on a low speed. This will take about 1 to 2 minutes for the butter and sugar to become fully incorporated. Then add vanilla and eggs, and mix until combined well. Once your wet ingredients are mixed, use a separate bowl to combine your gluten free flour, baking powder and salt with a whisk. In three increments, add the flour to the wet ingredients and mix until combined. Form dough into a ball using your hands.
Wrap the ball of dough in plastic wrap, and place the dough into the refrigerator for at least 2 hours or overnight.
Once you are ready to bake, preheat your oven to 350 degrees Fahrenheit, and prepare a baking sheet by placing parchment paper on top of the pan.
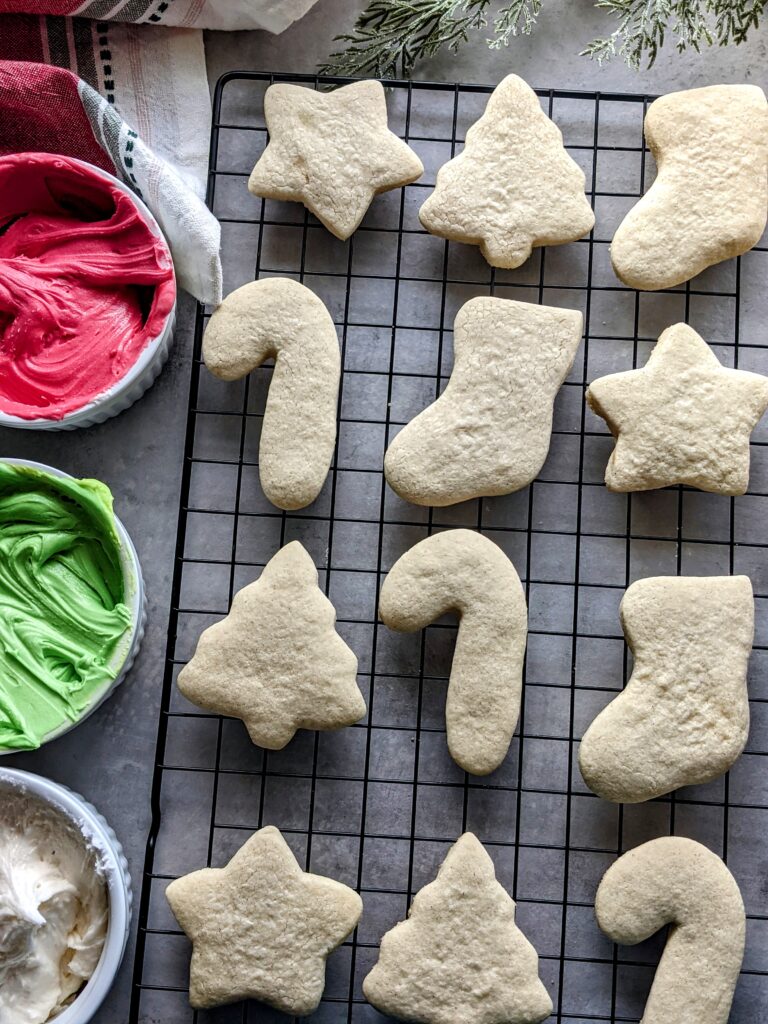
Remove the chilled dough from the refrigerator and place on the counter for 5 to 10 minutes to soften. Sprinkle a small amount of gluten free flour on your board before rolling. Remove the plastic wrap and place the dough on the board, press down slightly, and sprinkle flour on top of the dough. Roll dough out using a rolling pin. The dough should be rolled out to about ¼ inch thick. Do not roll it too thin. Cut cookies out using your favorite cookie cutters, or you can use a cup to make rounds if you do not have cookie cutters. Carefully place the cookies onto the parchment paper using a spatula if needed.
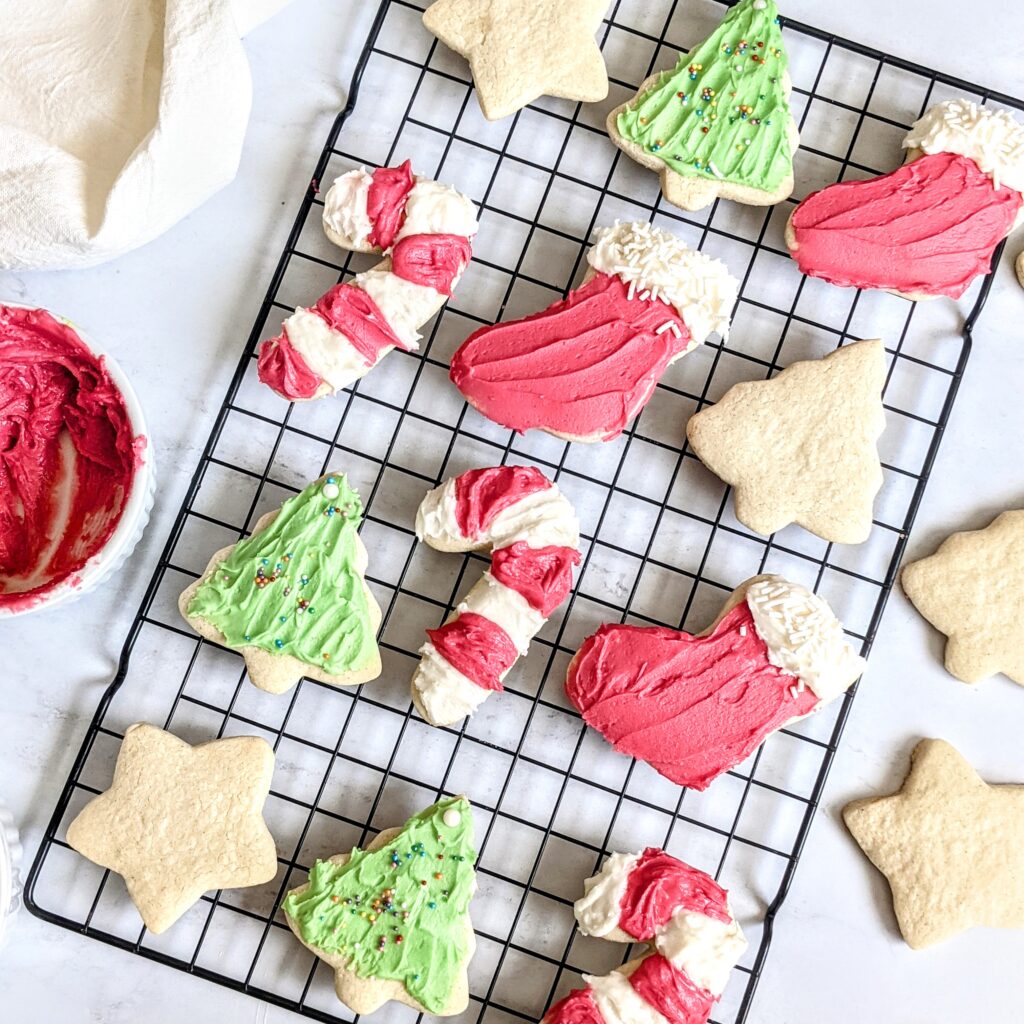
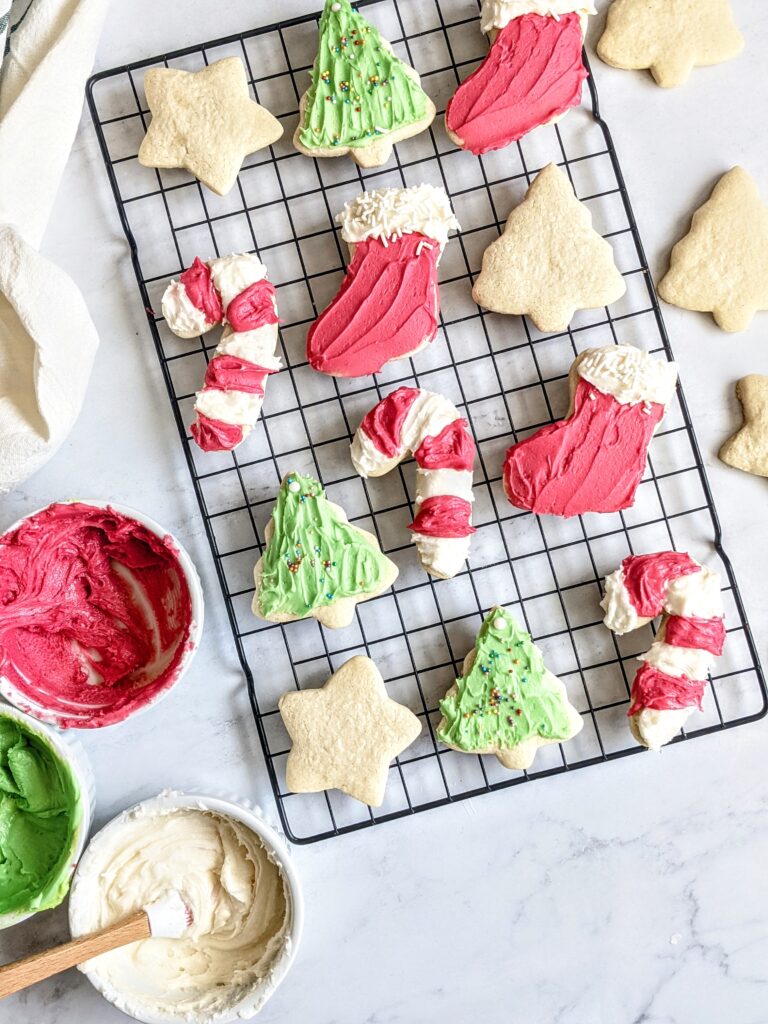
Bake for 8-10 minutes, until very lightly browned on the bottom. Watch your cookies. They should be slightly puffed and lightly browned on the bottom. Baking time may vary depending on the size of your cookie cutter. Do not over bake, or they will not be soft. Do not underbake or they will fall apart. These are very delicate cookies, so once they are done baking, remove them from the oven, and let them sit on the baking sheet for 5 minutes, until firm. Very carefully remove from the baking sheet with a spatula, and place on a wire cooling rack to cool completely. Once they cool completely, the cookies will hold together well for decorating.
Once you are ready to decorate you will make your buttercream frosting. Cream your butter by mixing with an electric mixer for about 5 minutes on medium speed. Add milk, vanilla and mix for 1 to 2 minutes. Add powdered sugar one cup at a time. Mix on a low speed so you do not spread powdered sugar all over your kitchen. Once all powdered sugar is incorporated, add your lemon juice and mix one final time. Your frosting will be light and fluffy. If you wish to color your frosting, Divide frosting into separate bowls and add a couple drops of each food coloring you choose to use, and mix well.
Begin decorating your cookies by gathering sprinkles, sanding sugar, and frosting. Use a frosting knife to cover the completely cooled cookie, and then immediately sprinkle decorative sprinkles and sanding sugar on the frosting. Place on a rack to dry. This is a wonderful collaborative family event. Everyone can join in and decorate cookies their way to make a stunning cookie display.
How to store these classic cookies?
To store these delicious cut out sugar cookies, you can leave them at room temperature in an airtight container for about 3 to 5 days. If you prefer to refrigerate them, then they will last for about 10 days. These cookies freeze well. If you stack them in a container to store, place a piece of parchment paper between layers, so they do not stick together.
Looking to make the dough ahead of time?
If you would like to make the dough ahead of time and bake later you can place the prepared dough in the freezer for about 3 weeks. When you are ready to bake, remove from the freezer and let the dough thaw for about an hour before beginning to roll out.
Can we substitute any ingredients?
When it comes to this recipe I have only tested it with dairy free butter in the place of regular butter and dairy free milk in place of the milk. You can add any flavor extracts you would like. You can decorate the cookies by dipping them in white chocolate, dark chocolate, or milk chocolate for a change. You can use pre-bought store frosting. You can decorate with your favorite candies, dried fruit, nuts, or whatever your imagination desires.
More amazing holiday recipes you need to try!
This is going to be your new go-to gluten free cut out sugar cookie recipe. These cookies hold their shape perfectly when baked, but still remain soft and chewy. Easy to make dairy free with a few substitutions. Be creative when decorating.
- 3/4 cup softened butter (dairy free or regular)
- 1 cup granulated sugar
- 2 eggs
- 1 tsp vanilla extract
- 2 1/2 cup gluten free flour
- 1 tsp baking powder
- 1 tsp salt
- 1/3 cup softened butter (dairy free or regular)
- 4 cup powdered sugar
- 1/4 cup milk
- 1/2 tsp vanilla extract
- 1/2 tsp lemon juice
- food coloring
- To make the dough, start by creaming the sugar and butter until smooth with your electric mixer on a low speed. This will take about 1 to 2 minutes for the butter and sugar to become fully incorporated. Then add vanilla and eggs, and mix until combined well.
Once your wet ingredients are mixed, use a separate bowl to combine your gluten free flour, baking powder and salt with a whisk. In three increments, add the flour to the wet ingredients and mix until combined.
Form dough into a ball using your hands. Wrap the ball of dough in plastic wrap, and place the dough into the refrigerator for at least 2 hours or overnight.
Once you are ready to bake, preheat your oven to 350 degrees Fahrenheit, and prepare a baking sheet by placing parchment paper on top of the pan.
Remove the chilled dough from the refrigerator and place on the counter for 5 to 10 minutes to soften.
Sprinkle a small amount of gluten free flour on your board before rolling. Remove the plastic wrap and place the dough on the board, press down slightly, and sprinkle flour on top of the dough. Roll dough out using a rolling pin. The dough should be rolled out to about ¼ inch thick.
Cut cookies out using your favorite cookie cutters, or you can use a cup to make rounds if you do not have cookie cutters. Carefully place the cookies onto the parchment paper using a spatula if needed.
Bake for 8-10 minutes, until very lightly browned on the bottom.
Remove them from the oven, and let them sit on the baking sheet for 5 minutes, until firm.
Remove from the baking sheet with a spatula, and place on a wire cooling rack to cool completely.
Cream your butter by mixing with an electric mixer for about 5 minutes on medium speed. Add milk, vanilla and mix for 1 to 2 minutes. Add powdered sugar one cup at a time. Mix on a low speed. Once all powdered sugar is incorporated, add your lemon juice and mix one final time.
If you wish to color your frosting, Divide frosting into separate bowls and add a couple drops of each food coloring you choose to use, and mix well.
Use a frosting knife to cover the completely cooled cookie, and then immediately sprinkle decorative sprinkles and sanding sugar on the frosting. Place on a rack to dry.

I am married to the most amazing man, Tommy. I am the mother of three beautiful children Landon, Finn, and Daisy. For years I have been helping friends, family and others navigate the life of gluten-free living. I grew up in a gluten-free house, my mom and both brothers were diagnosed with Celiac Disease when I was young. My mom did an amazing job making everything from scratch in a gluten free kitchen. When I had my first child Landon my world was changed. He was born at 24 weeks because I have a short cervix. The doctor told us that he had a slim chance of survival and that his life would be plagued with severe complications. He survived and has minimal complications due to his prematurity, but when Landon was two he started getting rashes all over his body and he would constantly be sick. My mom advised me to get Landon tested for Celiac Disease. This was the beginning of my true GF journey. Shortly after he was diagnosed, I decided to go off gluten as well. Although I do not have Celiac Disease, I have found that I feel 100% better eliminating gluten from my diet. Recently Finn was having some issues with his legs and knees hurting. The doctor told me to take Finn off gluten to see if it was causing the inflammation and pain. Sure enough once we changed his diet the symptoms went away. We have Celiac Disease and gluten intolerance on both sides of the family. My sister-in-law and niece were recently diagnosed and my Grandma recently took gluten out of her diet due to an autoimmune disease. We are in a fortunate position that both of our families understand the purpose of living a gluten-free lifestyle. I am on a mission to help people create amazing gluten-free recipes and to see that this diagnosis is not a curse, but can actually be delicious.


